Den svåra vägen
1. First thing is to get two jack stands and jack up the rear of the car as high as you can...I had my jack stands on the second hole from the bottom or as high as my floor jack would raise the car. Put the jack stands under the left and right side rear frame rails.
2. Open the gas tank filler door and remove the 3 screws that hold the white door to the interior black plastic cup...remove the white door. Unscrew the 3 screws that hold the black plastic interior cup into the rear quarter panel. You should now have nothing around the gas tank filler neck and be able to see down the filler neck to the gas tank.
3. Remove both rear tires/wheels.4. Next step is to drop down the muffler from it's mounts on the body. Driver side has one bolt through a hanging rubber bracket...passenger side requires 2 bolts be removed from the mounting bracket that bolts into the frame. Carefully lower down the muffler....don't let it fall on you! I also unbolted the exhaust pipe from the back of the catalytic (removed two nuts holding exhaust pipe flange to catalytic). This is important as it
makes it a lot easier later if you can move your exhaust pipe/muffler out of the way and you won't be able to if it's still bolted to the catalytic.
5. With the muffler hanging down, you can now access the small hex screws that hold the thin metal exhaust shields below the gas tank and above the rear axle. Remove all these screws and the two separate thin metal shield plates from the car.
6. Slide a floor jack under the center of the rear axle and slightly support the weight of the rear axle on the jack.
7. There is a flat bar that goes across the rear of the car...it's bolted to the driver's side frame with 3 bolts and the other end is attached to the passenger side with one long bolt. Remove these bolts and remove the bar. This bar is what some of the small hex screws from the exhaust metal shields screwed into.
8. The remaining horizontal bar that bolts to the frame on the driver side and to the axle housing on the passenger side should also be removed at this point.
9. Unscrew the main rear metal brake line from the flexible hose that goes to the distribution block on the axle. Remove the flexible brake line retaining clip that holds it to the metal frame bracket...the flexible brake hose should be free from the frame as it could be damaged when you lower the axle housing later if it was still attached to the driver side frame bracket. Some people have said you don't have to un-do the brake line...but I recommend you un-hook it and just bleed your rear brakes later to avoid damaging any brake lines.
10. Jack up the rear axle slightly to take pressure off the stabilizer bar....unscrew the 9/16 long bolts that hold the rear stabilizer bar to the frame brackets on both the driver and passenger sides. The bolts can be hard to get off as they rust pretty badly....if you break it, replacement poly bushings and bolts are still available/in stock at dealers as they fit a lot of years.
11. With stabilizer bar ends disconnected, remove the lower retaining nuts on the driver and passenger rear shocks. Carefully slide the shocks out of the rear axle mounting holes. Be sure the axle is supported on the floor jack as the axle can swing down now as the shocks no longer hold it up.
12. Slowly lower the floor jack to get the tension off the coil springs... let the axle drop as far as it can go...don't get nervous when the rear coil springs fall out....they are easy to reinstall and just sit on the axle pads.
13. Find the 4 metal fuel lines by the driver side frame. Two lines have screw clamps, one line has a tension clamp and the main pressure line has to be unscrewed with wrenches. Remove only the lower clamps on the three lines and slowly unscrew the main pressure line to relieve any pressure in the line. Slide the lines upward off the metal lines coming along the frame...all fuel lines should be above/disconnected from the metal frame lines.
14. Slide your exhaust system (muffler/pipe) as far to the passenger side of the car as possible above the rear passenger brake rotor assembly...this will help provide clearance as the tank is removed by sliding down and towards the passenger side wheel. Unscrew/remove the gas filler cap.
15. At this point, you're ready to unscrew the two long bolts that hold the gas tank retaining straps to the underside of the car. I made a point to drive my car to almost an empty gas tank to keep the weight of the gas tank as low as possible as I was doing the disassembly myself and it's no fun when you have a heavy/filled gas tank. The tank will be heavy and hard to handle if you have a lot of gas in it!!!
16. Remove the two retaining bolts and let the gas tank straps swing down...be sure and not bend the straps as it makes them much harder to reinstall...support the gas tank with your hands and slowly slide it towards the passenger side of the car. You will need to slide it as far to the passenger side as you can and then downward to clear a metal lip on the frame in the gas neck filler area. Don't force anything and don't bend the filler neck....it's tight but it should come out with slight rotations....move the exhaust pipe out of the way for extra clearance to enable the tank to drop out.
17. With tank out of the car...be sure and wipe/blow off any dirt or dust around the fuelsending unit so it doesn't fall in the gas tank when you remove the sending unit/pump.
18. Remove the sending un it by carefully rotating the round retaining ring counter-clockwise. I used a large flat bladed screwdriver and tapped it with a hammer to slowly rotate the ring and enable the fuel sending unit to be removed.
19. With the retaining ring opened, carefully/slowly pull the sending unit & fuel pump assembly up and forward to allow the unit to clear the splash baffles in the gas tank and come out of the tank. The factory fuel pump sock is long and a little tough to pull through the gas tank opening but go slow and work gently. You don't want to bend your fuel sending unit
float/rod as it will cause your gas gauge to read incorrectly. Hopefully, at this point, you have your first look at your old, weak fuel pump that will work much better with your new Walbro 340 in it's place!
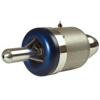
20. The factory fuel pump can be removed by cutting the black wire and gray wire that go into the stock GM pump...the old pump is removed by pulling downward and out. It will slide out of the pulsator assembly (the pulsator looks like a miniature master brake cylinder)...the pulsator slides onto the metal fuel line on the sending unit and the other end slides onto the
plastic output port on the fuel pump.
21. Plug the new black and red wiring harness onto the new fuel pump...it can only plug in one way... measure the wire length to ensure they can reach the just-cut factory gray & black wires...strip off about 1/4 inch insulation on the ends of the new red & black wires and also on the old gray & black wires...use the supplied wire connectors and crimp the black wire from the new pump to the black wire coming from the sending unit ground...crimp the new red wire from the new pump to the gray (power) wire from the factory wiring.
22. I re-used the pulsator and slid the new pump outlet into the bottom of the pulsato r...some folks discard the old pulsator and install a short 1-2 inch neoprene hose and 2 clamps in it's place between the new pump and metal fuel line...some feel that the pulsator seals can go bad and cause potential start-up problems until the pump re-primes pressure in the line...so they use the neoprene line with clamps to eliminate that possibility. Many folks have re-used pulsators with no problems...however, John Pearcy recommends using the neoprene hose approach instead of the pulsator.
23. I also removed the rubber jacket that went around my old GM fuel pump and re-installed it around the outside of the new pump before I slid the pump into the pulsator. Push the new fabric fuel sleeve/strainer on the bottom of the new pump and be sure it's tight on the pump. Check your pump wires and be sure they can't come in contact with the rod/float on the gas gauge. I used a black plastic zip tie to hold the wire s to the metal fuel line and ensure that they can't touch the float and eliminated the risk of my fuel gauge being messed up by contact with the wires.
24. Be sure the rubber o-ring seal is still in the groove on the top of the gas tank sending unit access hole...carefully slide the new pump/gauge assembly into the tank at about a 45 degree angle and be sure it clears the interior baffles as it goes back into the tank. The sending unit should easily sit on the tank after re-installation...hold the sending unit down and rotate the retaining ring clockwise by tapping lightly with a flat blade screwdriver and hammer until the ring stops rotating at the metal stops.
25. You should be good to go with gas tank re-installation by reversing the removal procedure outlined above. Be sure to re-install your coil springs in their rubber upper retaining cups before re-jacking up the axle....remember to bleed rear-bra kes to remove air in lines...remember to hook up all 4 fuel lines at frame rail. I also recommend you install a new
fuel filter at the same time you're under there to ensure the best fuel flow. The hot wire install is a breeze....John Pearcy has great directions with his kit....just be sure and mount the new relay assembly very close to the factory rear wiring/plug assembly as the new plug wire length limits how far you can mount it from the other factory plug. Be sure and install the
additional supplied ground strap on the gas tank by using one bolt on the exhaust hanger for a grounding point.
http://www.tacs.nu/forum/download.php?id=3391